Ultimate SMS - Bulk SMS Application For Marketing Documentation
Thank you 🙏 for purchasing Ultimate SMS - Bulk SMS Application For Marketing.
Created By 🛠: Codeglen Team
Ultimate SMS is a powerful, flexible, and User-friendly Bulk SMS Marketing Application. It’s also an all-in-one solution for your SMS marketing. It’s easy to use & install.
Quick Installation & Getting Started Tutorial
1. Configure Database
Login to cPanel and create a brand new database that will be used for Ultimate SMS installation.
You can check this tutorial how to setup MySQL database in cPanel if you are not familiar with how to configure a database, if you are not using cPanel the best is to perform few researches how to create database via your active control panel.
- Login to cPanel by accessing www.yourdomain.com/cpanel and navigate go MySQL Databases, note that this step may vary and in some hosting providers can be different.
- Create database.
- Create user and set up user password. (write down the username and the password because needs to be re-used later)
- Add the user to the database by selecting the database and the username.
- Make sure you have checked All privileges when adding the user to the database.
2. Upload files to the server
Upload the files to server folder where Ultimate SMS will be installed.
- Assume that you uploaded the files to “portal” folder, navigate to Eq. http://yourdomain.com/portal/install – Keep in mind that you need to adjust the URL based on where you uploaded the files. If you are installing on subdomain named eq portal you need to access the URL like http://portal.yourdomain.com/install.
- If all server requirements passed click Go to Files/Folders Permissions otherwise consult with your hosting provider to fix/enable them.
- If all permissions are passed click Setup Database otherwise you need to set 775
permissions for
storage/framework,storage/logsandbootstrap/cachefolders - Enter the database credentials you configured in step 1
- Click Check Database and if the database connection is successful you will be passed to the latest step otherwise please re-check your credentials and hostname. (usually, hostname is localhost but you should check with your hosting provider)
- Re-check if the base URL is correct – Base URL is Laravel required configuration and is the URL where your system will be installed..
- For SSL use, please select
HTTPSenabled. Otherwise, your application will not work. - Enter your email address and password that will be used for login.
- Select your timezone – Not recommended changing your timezone after you start using Ultimate SMS.
- Click Save, if the installation is successful you will see the message Installation Successful.
- Finally, Login with your super admin credentials and insert your purchase code to verify your application.
3. After Installation Setup
How Ultimate SMS Work
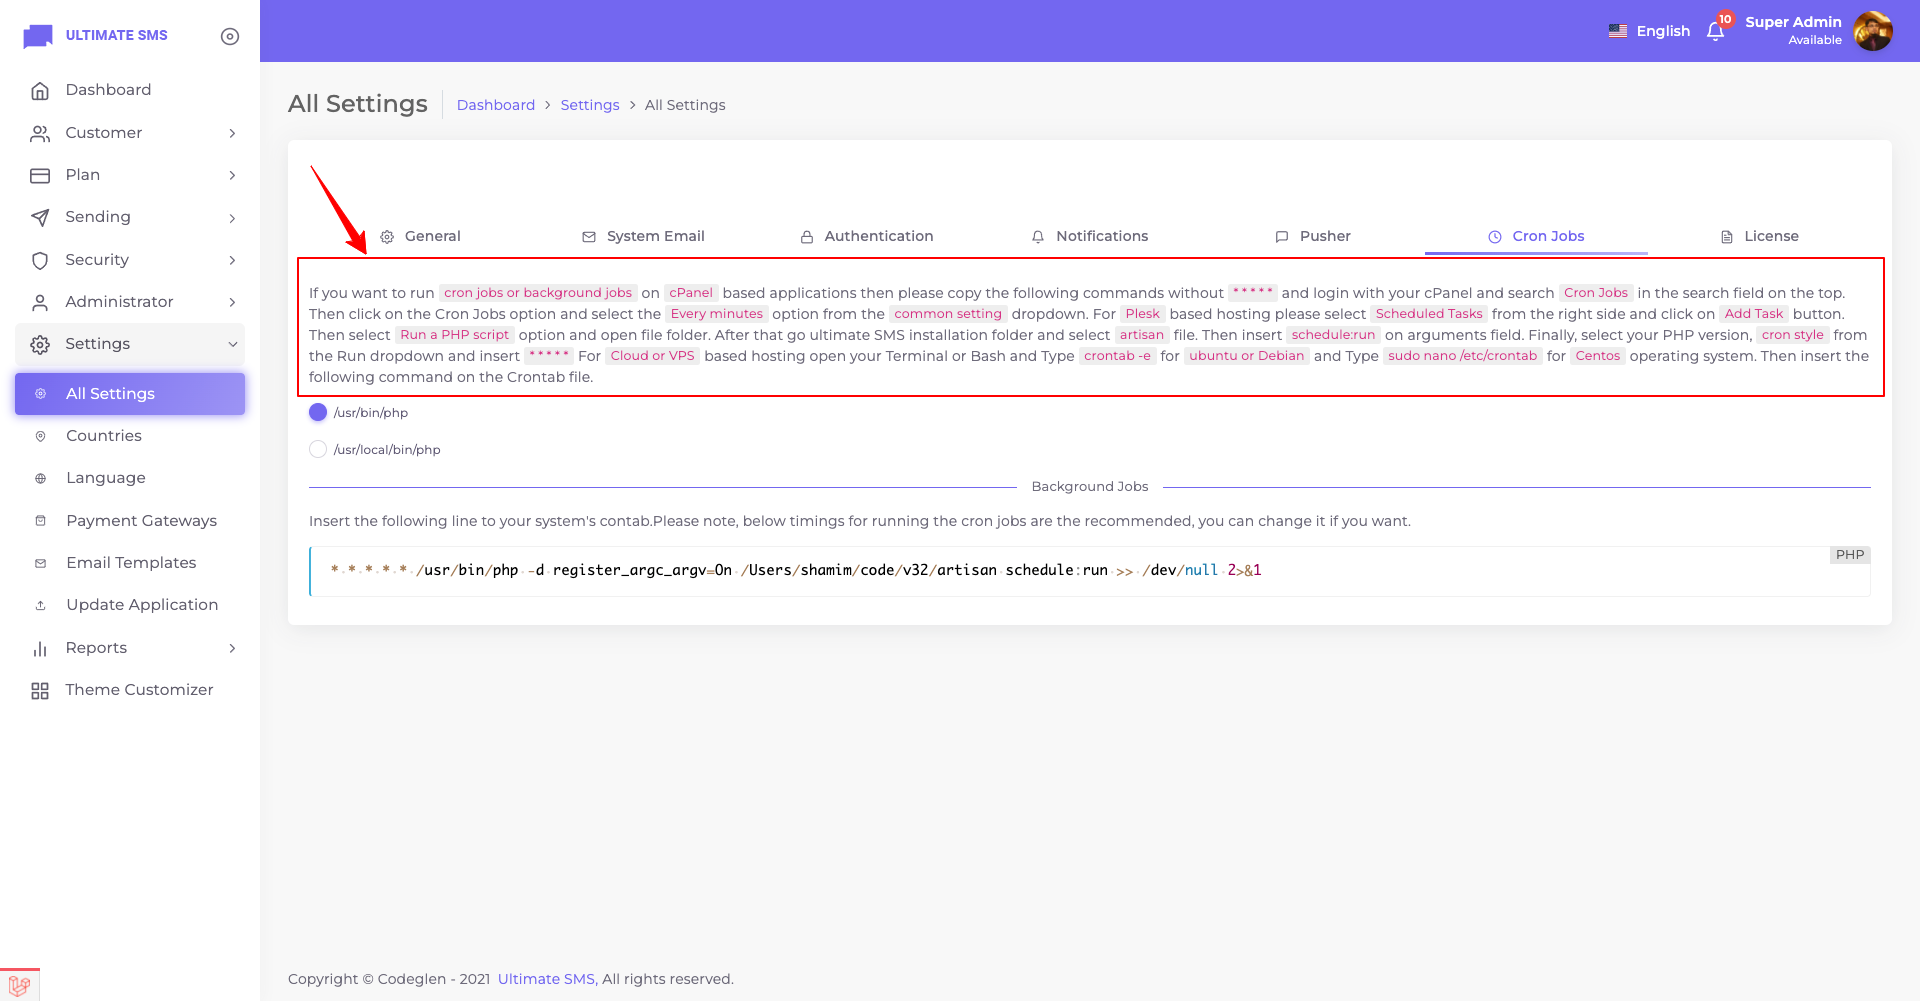
Setup Cron Job
For cPanel based hosting:
For cloud-based hosting:
For others hosting:
If you are not using cPanel or cloud-based hosting ex. ubuntu then please
Login with your admin portal and go Settings -> All Settings -> Cron Jobs
Options
Application Branding Setup
Navigate to Settings -> All Settings -> General to configure
your Application/Brand Name, Application Title, Logo, Favicon, Default Language, and many
more.
Localization
Navigate to Settings -> Language to configure your application
language. You can add or remove application localization using this option.
Configure General Email
Setup SMTP Email by navigating to Settings ->
All Settings -> System Email
Currency
Navigate to Plan -> Currencies – If your currency is not
listed add your own currency. By default with the installation comes with 11 popular
currencies.
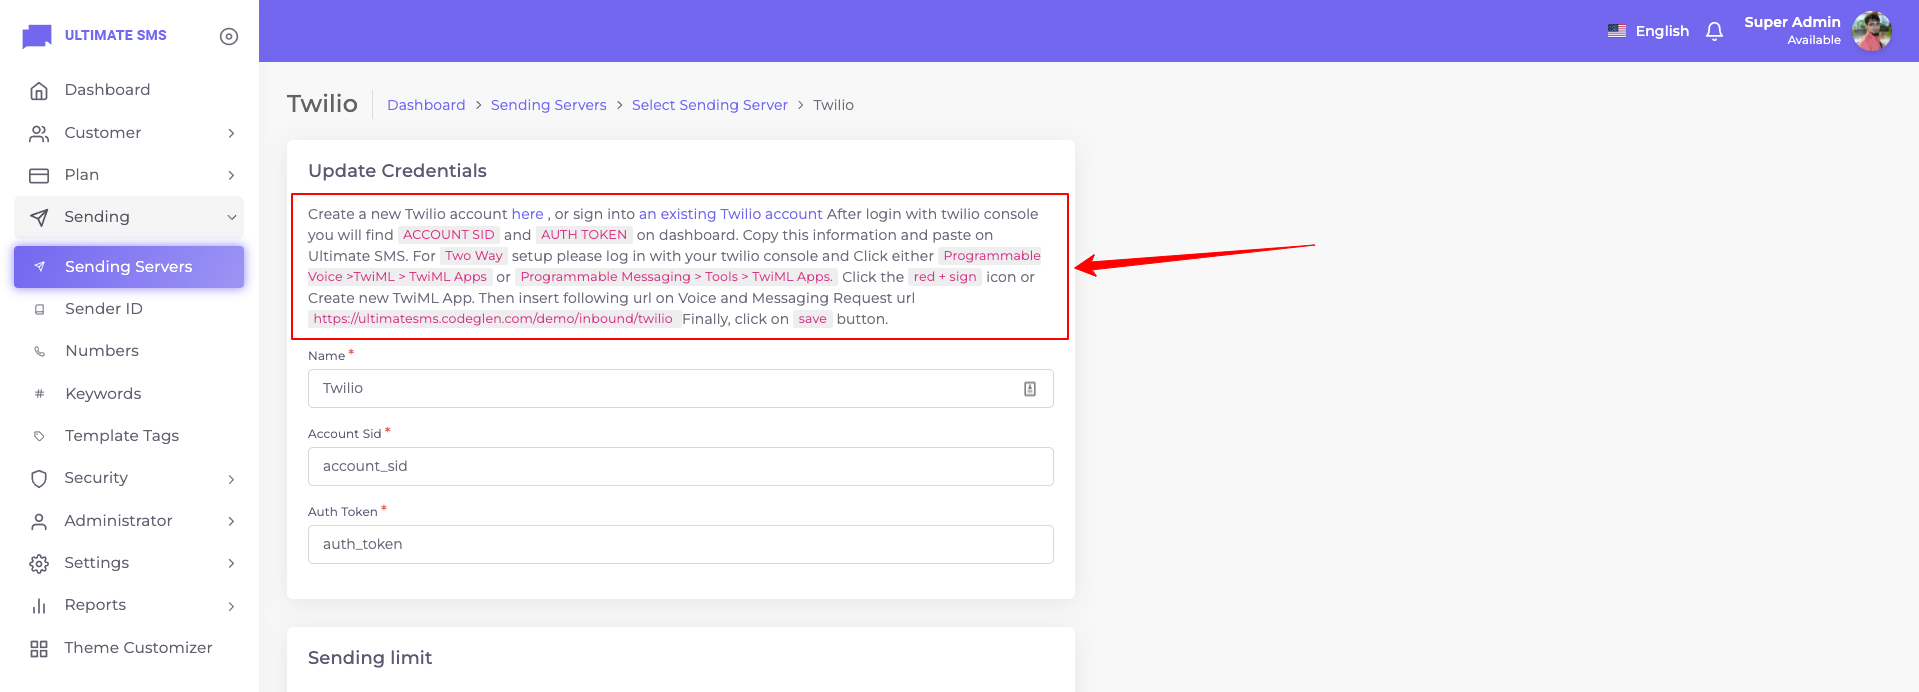
Sending Servers
Add Sending
Servers by navigating to Sending -> Sending Servers -> Add Sending Server.
You will find all details on Update Credentials form.
Plans
Create Plans by navigating to
Plan -> Plans -> Add New
Customers
Create Customers by
navigating to Customer -> Customers -> Add New
Subscriptions
Assign your created plan to customer by navigating to Customer ->
Subscriptions -> New Subscription or Customer -> Customers -> Edit ->
Subscriptions
Sender ID/Phone Numbers
Assign Sender ID or Phone Numbers to customer by navigating
to Sending -> Sender ID -> Create or Sending -> Numbers -> Create